 This helpful advice comes from Marcin Hashevsky, serial entrepreneur, successful Amazon seller and systematization coach. Marcin helps Amazon sellers systematize their business so they can spend less time on day-to-day operations and more time on vision and growth. More on Marcin here: amazingworksystem.com
Tools that Let Your Amazon FBA Business Practically Run Itself
Right now, I am going to share something that I love – how to organize your reordering process using Asana and your company’s own wiki.
There are basically three takeaways that you should look for here:
- How can I leverage the awesomeness of Asana or Trello for my Amazon business?
- How can I use my own company’s wiki to maintain a seamless workflow?
- How can I create a system for re-ordering that’s so seamless, I don’t even have to be a part of it?
In a nutshell, the goal of this process is to “work smarter, earn better”.
I’ve created a step-by-step guide to walk you through the process of creating tasks in Asana to manage your reorders. You can get a free copy for yourself here.
So whenever I establish that a new stock order must be placed, all I have to do is use my tried and tested template that you just downloaded. This template uses Asana and my company’s wiki to create the perfect, systemized restocking process for my Amazon FBA business.
Step 1: Initiate the Process
The first thing on my template that you just downloaded is the name. It’s a rather unique naming convention that I use and recommend that you do so as well:
“PX Name [QTY] [Amazon Shipment ID]”
Basically, it helps me and my virtual assistant (VA) easily know which tasks we are talking about. I will explain this further.
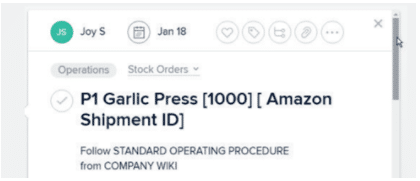
So the first thing you see is the P1 – this is the job name as whenever I want to talk specifically about a recent restocking job we did, I will refer it to P1, P3, P5 etc. The QTY is simply the number of items we will be requesting; in this case 1000 units. The Amazon Shipment ID is added here when we get one.
Request for Order Quantity
So now that I have initiated the process, I will tag my VA into the task and they will start working on it.
First order of business is to notify the manufacturer about the order and ask them to share the “purchase invoice” or PI with us.
This is where my company wiki comes in for the first time. Using a prepared template, they will send the email asking the manufacturer to place the order, gives them the quantity required, and asks for the PI.
Employees can copy and paste the email from the company Wiki and update it with any specifics that go with this particular reorder. Here’s what it looks like:
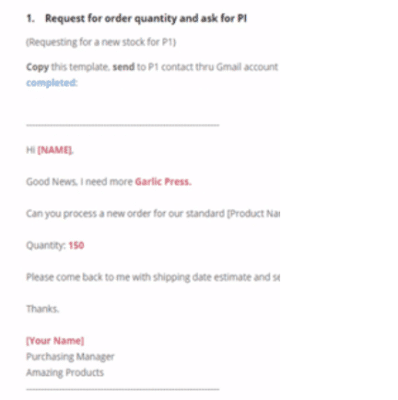
As you can see, my VA only has to change the [Name] with the manufacturer’s.
Add the product name like shown here with Garlic Press.
Add quantity, 1000 by removing 150.
And sign off with the name.
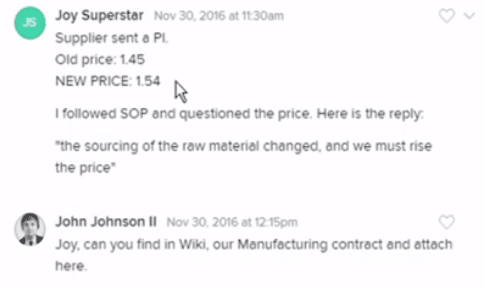
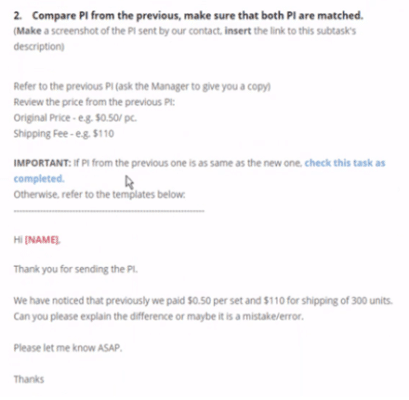
Match PI to Previous Versions
Once the invoice arrives, it’s important to compare it to previous PI.
Over time, we added this step to our process because it easily helps reduce the number of errors. You can see right away if they’ve changed the price since your most recent order.
If the PIs match, mark the task as complete. If not, contact the manufacturer to ask about the discrepancy.
Here’s an inside look of how we communicate on this matter.
To contact the manufacturer, we have the template ready in our wiki. Here’s what it looks like:
Set Up Payment Task
So once we have confirmed the prices of the newly ordered task, it is now time to pay up. I usually have to do this. My VA will be using Asana to create a task for me so that I don’t forget about it. So once she does that, she will check this task closed.
Pay Invoice
Once a task has been set up as shown below, I will continue to pay the manufacturer.
There is a reason why we create this task, it helps the VA not only to share the details of the invoice but also once I have paid the manufacturer, I attach the invoice for future tasks within this process.
Request Estimate of Shipping Date
Once I make the payment, attached the screenshot (proof of payment) of the invoice in the previous task and close it, my VA will know that she can ask for the shipping date from the manufacturer.
Like the templates before, the VA will only have to edit the information required like the
- Name of the merchant
- Proof of Payment (That I have already attached in previous step)
- The Name of the VA
Notice how we remind the manufacturer that this is not a confirmation for them to send the delivery and that they should wait for our confirmation. They store our previous shipping details and we want Amazon to share the new shipping addresses with us. But, more on this later.
Request Complete Shipment Information
This task initiates the process of setting up a shipment within Amazon Central. To do so, my VA will request specifics about the shipping order and share how we want our stock to be delivered. Here’s the template that they will use:
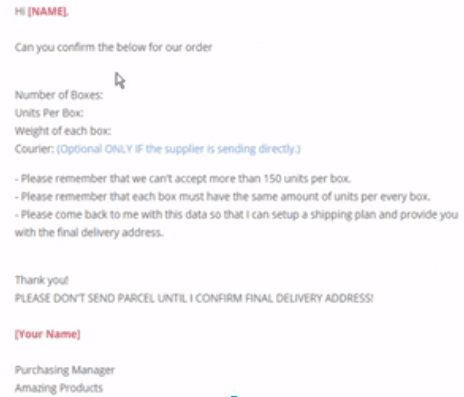
Here my VA will simply have to fill in the details in the template like:
- The name of the manufacturer,
- Number of boxes,
- Units per box,
- Weight of each box,
- Courier: This is an optional question and is dependent whether the supplier will send the stock directly.
- And then simply the name of the VA.
Include a reminder to the supplier to confirm the final delivery address before shipping.
Set Up Shipment in Amazon
When you have the shipping information you need, set up the shipping information within Amazon Central. We have created a video in our company Wiki to walk employees through this process.
Since this is little complex and chances of mistakes are higher, I have created another template along with a video for my VA and employees to easily do this step.
This will create the Amazon Shipment ID you need for your title. My VA will then add this ID into the task name as well.
Email Information to Supplier
With this task, your employee sends the supplier the final delivery address for the item.
Along with the address, you will also need to send instructions on how to print your shipping labels and place them on the box.
If you have any special packing instructions, include these in this email.
Send Labels to Supplier
This task merely involves sending all labels to the supplier that are needed to ship the package.
Once the supplier has these labels, its employees can begin the process of preparing items to ship.
Request Shipping Confirmation
Being in the business that runs mostly on shipping, it is imperative that you know when the stock has left the manufacturer and coming to its destination.
With an email template already available in the company wiki, all my VA needs to do is send it and acquire the tracking number from the manufacturer. Once we get the tracking number, my VA will close this task.
Mark as Shipped on Amazon
Once the item has been confirmed, add the tracking information in Amazon and mark the item as shipped.
This allows your business, Amazon, and the recipient to track the shipment’s progress.
Track Item Every Day
Even though your item is on the way, the work isn’t complete.
Shipments can experience delays due to customs, weather, and other factors, so it’s important to check every day to make sure it is still on schedule.
Set this as a recurring task so that it will remind the appropriate personnel to check on the shipment on a daily basis. If the employee notices a problem, he or she should insert a comment describing the issue. The Parcel App is a handy app for seeing all your shipments in one place.
Amazon Inbound Shipping Receiving Confirmation
When the item arrives at FBA warehouse, you will receive an email from Amazon confirming that the package has been delivered. Once this email has come in, mark this task as complete so that all the team members who follow this process get notifications and know what’s happening,
Amazon Inbound Shipment Received Confirmation
Same here, this time Amazon informs you that the Receiving is finished. This item triggers the next one in the line, which is:
Set Up a Task for the Operations Manager to Sign the Process OFF
The final step in this Asana checklist should go directly to the operations manager, letting him or her know that the entire process is complete. Now that the manager has confirmed the shipment has arrived and all is good with Amazon, he or she can mark this WHOLE task as complete, which will finalize all work on that reordering process.
And there you go, I believe that the task management system I described above should not only be used for assigning small tasks but it can also be well utilized for longer processes like this one.
Over time, you’ll be able to build Asana templates that help you with other types of processes in different areas of your Amazon business.
If you are interested in learning more about how to systemize your Amazon business, I would recommend that you download my video explaining this process here.